How to install a bidet attachment
TUSHY publishes eight and a half minutes. That is achievable, provided the shut-off valve turns and you put the T-valve in the right place.
By Sawyer V. · · How we research
The short answer
We earn a commission if you buy through the links on this page, at no extra cost to you. It does not change which products we pick or what we say about them — here is exactly how that works.
Quick picks
Tap any row for the full write-up. Prices are checked against Amazon rather than remembered — where we have no verified figure the button says so.
| # | Product | Best for | Renter | Price |
|---|---|---|---|---|
| 1 |  TUSHY Classic 3.0 Bidet Attachment The only attachment that publishes an install time, the tools required and what is in the box — so there are no surprises mid-job. | A first-time fit | Safe | |
| 2 |  Brondell SimpleSpa Thinline Essential Bidet Attachment An all-metal T-valve and braided metal hose — the two components that stay under pressure once you have walked away. | A joint you will not think about again | Safe |
Check these two things before you order
Does the shut-off valve turn? Go and try it now. It is the small valve on the wall or floor behind the toilet, and in older properties it seizes. A seized valve does not make this job hard, it makes it impossible — and discovering that with the water off and the seat in pieces is a bad evening. If it will not turn, leave it alone: forcing a corroded valve is how a small job becomes a flood.
Will the seat bolts come off? Lift the caps at the back of the seat and look. Plastic bolts usually undo easily. Metal ones on a fifteen-year-old toilet may be corroded to the nut underneath, and that is genuinely the hardest part of this whole install — harder than any of the plumbing.
Where the T-valve goes, and why it matters
The T-valve is a brass or plastic tee that splits the toilet’s water supply: one branch carries on filling the tank, the other feeds the bidet.
It goes at the tank end of the flexible supply hose — at the fill valve underneath the tank — and not at the wall end. Brondell publishes this explicitly, and the reason it is worth stating is that the hose has a fitting at both ends and physically reaches either way. The tank inlet is where the connection is designed to be opened and re-made; the wall end is the supply side and is not.
There is also a practical reason. Fitted at the tank, the T-valve sits above the shut-off valve, so you can still isolate the toilet and the bidet together in one turn if anything ever goes wrong. Fitted at the wall, you have put a joint upstream of your own isolation point.
Why there is no thread tape in this job
If you have ever fitted a showerhead, you will be reaching for PTFE tape. Do not.
Shower arm joints are tapered threads that seal on the thread itself, which is what the tape fills. Toilet supply connections seal on a rubber washer that sits inside the nut and compresses against a flat face. Tape does nothing there, and it can hold the washer slightly off its seat, which is a leak you then cannot diagnose.
Hand-tight, on a properly seated washer, is the correct specification for all three joints in this install.
What to do about a drip
Turn the water off first. Then take the joint apart and look at the washer rather than reaching for the wrench.
In our reading of these manufacturers’ guidance, virtually every leak on a bidet install is one of three things: a washer that has slipped out of position, a washer fitted the wrong way round (they are often tapered, and Brondell publishes that the tapered side goes up), or debris caught between the washer and the seat.
Tightening harder fixes none of those and will eventually crack a plastic fitting. Take it apart, look, reassemble.
Removing it later
This is the install run backwards and it takes about the same ten minutes: shut-off valve off, flush, disconnect the bidet hose, unscrew the T-valve, reconnect the original supply hose to the tank, unbolt the seat, lift the plate out, bolt the seat back down.
The only thing that makes it hard is not having kept the original supply hose. Put it in a bag on the day you install. That single habit is why we rate attachments Safe on the renter-safe scale — the reversibility is only real if the parts still exist.
Bidet seats: the same job plus a plug
Installing an electric seat follows the same water sequence with two differences. The old seat comes off permanently and a mounting plate takes its place, and the seat needs to reach an outlet — Brondell publishes 4 feet of cord on the SE400 and 3.9 feet on the Thinline T22.
Brondell publishes the SE400 as a “simple, DIY installation” with “no plumber required”. It is. The one non-negotiable is that if the cord does not reach the outlet, the answer is a different product — not an extension lead on a bathroom floor.
Every pick in full
2 we would buy. Each carries its Renter-Safe Install Rating, the published specs behind it, and the honest gap in what we know.
1. Easiest to install
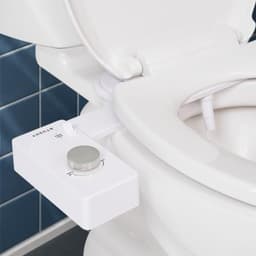
TUSHY Classic 3.0 Bidet Attachment
TUSHY · Classic 3.0 · best for a first-time fit
The only attachment that publishes an install time, the tools required and what is in the box — so there are no surprises mid-job.
TUSHY publishes an install of “8 ½ minutes or less on most standard toilets” and says plainly that “you don’t need any plumbing expertise…using a basic screwdriver and the connections included”. The box list is published, so you know before you start that the tank adapter and hose are in there.
It also publishes what will not fit: French Curve toilets. Being told the exception up front is the difference between a ten-minute job and an evening of improvisation.
Renter-Safe Install Rating
- Drilling
- None
- Tools
- Hands only
- Time to fit
- About 9 minutes (TUSHY publishes “8 ½ minutes or less”)
- Power
- None
- Reversible on move-out
- Fully
Why: It sits between the toilet bowl and the existing seat and tees off the tank fill line. Nothing is drilled, nothing is cut, and the original seat goes back on in the same nine minutes it took to fit.
Read from published documentation, not from fitting one. TUSHY, Classic 3.0 bidet attachment product page and FAQ. How the verdict is derived: renter-safe ratings explained.
What’s wrong with it
Cold water only — the install is easy, the January mornings are not.
What we can’t tell you
TUSHY publishes no materials for the body or nozzle.
Published specifications
| Water | Fresh cold water only — “cleans your butthole with fresh water, the same as your sink or shower” |
|---|---|
| Nozzle | “Patented Self Cleaning SmartSpray™ nozzle” that “cleans after every spray and tucks away when not in use”, with a “precision nozzle adjuster” |
| Control knob | “antimicrobial bamboo or brass knob” |
| Dimensions | “16″L x 9″W x 3.5″H”, “2 lbs” |
| In the box | “TUSHY Classic 3.0 Bidet Attachment. Tank Adapter and Flexible TUSHY hose for an easy install on almost any toilet. TUSHY Classic 3.0 Owner’s Manual. 1-year Limited Warranty.” |
| Install time | “Easy install in 8 ½ minutes or less on most standard toilets” |
| Tools | “you don’t need any plumbing expertise…using a basic screwdriver and the connections included” |
| Power | “No outlet needed” |
| Fit | Fits “95% of toilets, round or elongated”; does not fit French Curve toilets |
| Warranty | “1-year Limited Warranty” |
Source: TUSHY, Classic 3.0 bidet attachment product page and FAQ
#ad Price $129.00 as of October 19, 2026. Prices change; Amazon’s listing is the one that counts. How we’re funded.
2. Best fittings to install
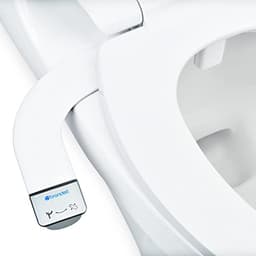
Brondell SimpleSpa Thinline Essential Bidet Attachment
Brondell · SS-150 · best for a joint you will not think about again
An all-metal T-valve and braided metal hose — the two components that stay under pressure once you have walked away.
Step five is the only part of this job that leaves anything permanently pressurized, so it is the part where component quality actually matters. Brondell publishes a “braided metal hose and all-metal T-Valve” where most makers say nothing at all.
Brondell also publishes the T-valve position clearly — at the fill valve under the tank, not at the wall supply — which is the instruction most likely to be got wrong and most often left vague.
Renter-Safe Install Rating
- Drilling
- None
- Tools
- Hands only
- Time to fit
- Not published
- Power
- None
- Reversible on move-out
- Fully
Why: Brondell publishes an under-seat fit with a metal T-valve at the tank. There is no fixing into any surface, so removal is the install run backwards.
Read from published documentation, not from fitting one. Brondell, SimpleSpa Thinline Essential Bidet Attachment (SS-150). How the verdict is derived: renter-safe ratings explained.
What’s wrong with it
Single nozzle, cold water. It is a well-built minimum rather than a feature list.
What we can’t tell you
No published install time or tool list, so first-timers get less hand-holding than with TUSHY.
Published specifications
| Dimensions | “15.4″(W) x 9.15″(L) x 1.6″(H)”, profile “0.2 inches” |
|---|---|
| Weight | “0.6 lbs” |
| Water | “refreshing, ambient temperature wash” — cold only, no heating |
| Nozzle | “angled nozzle”, “retractable”, with “on-demand, self-cleaning” and a “hygienic nozzle guard” |
| Hose and valve | “braided metal hose and all-metal T-Valve” |
| Power | “Powered by water pressure alone, no batteries or electricity required” |
| Fit | “Universal, adjustable toilet fit” that “installs under your existing seat” |
| Tools | Not stated; Brondell publishes “no plumbers or plumbing knowledge required” |
| Warranty | “1-year warranty provided by US-based customer service team” |
Source: Brondell, SimpleSpa Thinline Essential Bidet Attachment (SS-150)
#ad Price $31.99 as of October 19, 2026 $39.99 (20% off). Prices change; Amazon’s listing is the one that counts. How we’re funded.
Where to buy
Everything recommended on this page, in one place. Each link is an Amazon Associates link — we earn a commission at no extra cost to you, and it never decides a pick.
- $129.00View on Amazon
TUSHY Classic 3.0 Bidet Attachment
TUSHY · Classic 3.0 · Renter verdict: Safe
- $31.99View on Amazon
Brondell SimpleSpa Thinline Essential Bidet Attachment
Brondell · SS-150 · Renter verdict: Safe
#ad Prices are not shown because we only publish figures we have verified on the day. How we’re funded.
Questions people actually ask
can i install a bidet myself
Yes. TUSHY publishes an install of eight and a half minutes or less on most standard toilets using a basic screwdriver and the connections included. The two things that decide whether it goes smoothly are whether the shut-off valve turns and whether the seat bolts come off.
how to install a bidet
Shut off the water and flush, unbolt the seat, sit the bidet plate on the bowl, bolt the seat back down through it, fit the supplied T-valve at the tank inlet, reconnect the original hose and run the bidet hose from the T to the unit, then turn the water on and check all three joints.
bidet toilet seat installation cost
Nothing, if you fit it yourself — and every manufacturer here publishes it as a DIY job with no plumber required. The costs that catch people out are a replacement supply hose if yours is old, and occasionally a new shut-off valve if the existing one has seized.
Sources
Read next
Back to Bidets & Toilet Seats.