How to replace a shower head in about fifteen minutes
This is the easiest plumbing job in the house and the one most people are least sure about. Five steps, one tool, and one mistake worth avoiding.
By Sawyer V. · · How we research

The short answer
We earn a commission if you buy through the links on this page, at no extra cost to you. It does not change which products we pick or what we say about them — here is exactly how that works.
Quick picks
Tap any row for the full write-up. Prices are checked against Amazon rather than remembered — where we have no verified figure the button says so.
| # | Product | Best for | Renter | Price |
|---|---|---|---|---|
| 1 | No photo yet High Sierra Classic Fixed Showerhead (FCS-100) Solid metal, a universal 1/2-inch thread, and a wrench in the box — the fewest ways for a first attempt to go wrong. | A first-time replacement | Safe | |
| 2 |  Delta In2ition Two-in-One Shower, 1.75 GPM Since the job is identical, this is the swap that gets you a fixed head and a handheld for the same one threaded joint. | Getting a handheld out of the same fifteen minutes | Safe |
What you need, and what you do not
You need: one adjustable wrench, a roll of PTFE tape (also sold as plumber’s tape or thread seal tape, and it costs about a dollar), a rag, and an old toothbrush. That is the entire list.
You do not need: to turn off the water at the main. The shower’s own mixer is already closed, so the pipe is not under pressure at the arm. Some trapped water will run out when the old head comes off, which is why the rag is on the list.
You also do not need a plumber, a permit, or your landlord’s permission. This is the most reversible change you can make to a bathroom — see what you can change in a rental bathroom for where the actual line sits.
The tape direction, because this is the step people get wrong
PTFE tape seals a threaded joint by filling the tiny spiral gap between the two sets of threads. For that to work it has to stay in place while the head screws on.
Hold the shower arm and look straight into its open end. The new head will screw on clockwise from that view, so wrap the tape clockwise too. The head then turns with the tape and beds it into the threads. Wrap it anticlockwise and the head unwinds the tape as it goes on, bunching it up at the end of the thread where it does nothing at all — and then the joint drips and you assume you needed to tighten harder, which is how threads get damaged.
Three to four layers is right. One is not enough to seal; eight makes the head hard to start and can split a plastic collar.
The five things that go wrong, and what to do
The old head will not budge. Almost always corrosion in the joint. Hold the arm firmly with a cloth-wrapped hand or a second wrench so you are not twisting the pipe inside the wall, and increase force gradually. If it still will not move, wrap the joint in a vinegar-soaked cloth for an hour and try again. Never lever against the tile.
The shower arm turns instead of the head. Stop immediately. The arm threads into a fitting inside the wall, and unscrewing that fitting is the one way this job becomes a real repair. Hold the arm still and turn only the head.
It drips at the joint afterwards. A quarter turn more first. If it still drips, take it off, remove every scrap of tape, and start again — almost always the tape was wrapped the wrong way or old tape was left underneath.
The new head is loose but will not go further. There is debris on the threads or the tape has bunched. Off, clean, re-tape.
The spray is weak with a brand-new head. The head is not the problem: the restriction is upstream, in the arm or the supply. The low-pressure page covers what to check.
While the head is off, look at the arm
You will not get a better look at the shower arm than in the two minutes it is bare. Two things are worth checking.
Are the threads clean and undamaged? Crushed or corroded threads are why some joints never seal properly, and an arm is an inexpensive part to replace while you are already here.
Is the arm the right length and angle for you? Height and reach are set by the arm, not the head, and swapping it is the same kind of threaded job. If you are tall and the water hits your shoulders, that is an arm problem — the shower arm explainer covers it.
Keep the old head
Put it in a bag with the leftover tape and label it. If you rent, that bag is your deposit: five minutes on move-out day and the bathroom is exactly as you found it, with your new head coming to the next place. If you own, it is the spare that saves you an evening when something eventually fails.
Every pick in full
2 we would buy. Each carries its Renter-Safe Install Rating, the published specs behind it, and the honest gap in what we know.
1. Easiest first swap
High Sierra Classic Fixed Showerhead (FCS-100)
High Sierra Showerheads · FCS-100-CH · best for a first-time replacement
Solid metal, a universal 1/2-inch thread, and a wrench in the box — the fewest ways for a first attempt to go wrong.
If this is your first time, the two things that help most are a standard thread and a metal body. High Sierra publishes a “universal 1/2″ - 14 NPS or NPT male threads size” and “solid lead-free and corrosion resistant metal construction”, and a wrench comes with the head.
Metal matters here because the classic beginner error is overtightening, and a plastic collar is what cracks when you do. There is nothing on this head to break with a quarter turn too many.
Renter-Safe Install Rating
- Drilling
- None
- Tools
- One wrench
- Time to fit
- Not published
- Power
- None
- Reversible on move-out
- Fully
Why: It threads onto the existing 1/2″ shower arm and nothing else is touched. Keep the old head in a drawer, screw it back on the day you move, and the bathroom is exactly as you found it.
Read from published documentation, not from fitting one. High Sierra Showerheads, Classic Fixed Showerhead FCS-100-CH. How the verdict is derived: renter-safe ratings explained.
What it costs to run — Water
- Flow rate
- 1.25 GPM (the lowest published option)
- Shower length
- 8 minutes
- Showers
- 365 a year
1.25 GPM x 8 min x 365 = 3,650 gallons a year, against 7,300 for a 2.5 GPM head
About 3,650 gallons a year saved against a full-flow head
Arithmetic on published specifications, not a measurement. Rate source: High Sierra Showerheads, Classic Fixed Showerhead product page (published flow-rate options).
What’s wrong with it
No spray settings at all — one flow, one pattern, no adjustment.
What we can’t tell you
High Sierra does not publish an installation time or a torque figure, so the fifteen minutes above is our estimate of the job rather than theirs.
Published specifications
| Flow rate options | 1.25 GPM (“Saves up to 50% water and the energy to heat it”) through 2.5 GPM (“Maximum flow rate per shower head allowed nationally by the Federal Government”) |
|---|---|
| Nozzle design | A single nozzle that works “just like nature does, by colliding water to create a rain-like cascade of large, heavy, high-energy droplets” |
| Material | “Solid lead-free and corrosion resistant metal construction” |
| Thread | “Connects to shower arms, extensions, filters, etc with universal 1/2″ - 14 NPS or NPT male threads size” |
| Certification | “Independently tested and certified to WaterSense and WaterMark” |
| Guarantee | “The NEVER-CLOG GUARANTEE is void if the mesh screen is removed” |
| Made in | “Engineered and built in the USA” |
| Tools supplied | A wrench is supplied with the showerhead |
Source: High Sierra Showerheads, Classic Fixed Showerhead FCS-100-CH
#ad We have no verified live price for this one right now, so we are not showing a number. How we’re funded.
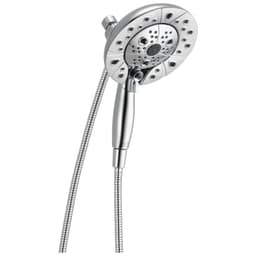
2. Best upgrade while you are up there
Delta In2ition Two-in-One Shower, 1.75 GPM
Delta · 58480-BL-PK · best for getting a handheld out of the same fifteen minutes
Since the job is identical, this is the swap that gets you a fixed head and a handheld for the same one threaded joint.
The install for a two-in-one is exactly the install above: unscrew, clean, tape, screw on. You are already holding the wrench, so it is worth knowing that the same fifteen minutes can buy you a handheld as well as a new head.
Delta publishes 1.75 GPM at 80 psi, five settings, a 60-inch hose and a WaterSense label. The only extra step is screwing the hose into the docking head, which is hand-tight and needs no tape.
Renter-Safe Install Rating
- Drilling
- None
- Tools
- One wrench
- Time to fit
- Not published
- Power
- None
- Reversible on move-out
- Fully
Why: The whole assembly hangs off the existing shower arm on one threaded joint. Delta publishes no bracket that needs fixing to tile.
Read from published documentation, not from fitting one. Delta, H2Okinetic In2ition 5-Setting Two-in-One Shower 58480-BL-PK. How the verdict is derived: renter-safe ratings explained.
What it costs to run — Water
- Flow rate
- 1.75 GPM at 80 psi (Delta's published figure)
- Shower length
- 8 minutes
- Showers
- 365 a year
1.75 GPM x 8 min x 365 = 5,110 gallons a year, against 7,300 for a 2.5 GPM head
About 2,190 gallons a year less than a full-flow head
Arithmetic on published specifications, not a measurement. Rate source: Delta, In2ition 58480-BL-PK specifications (1.75 gpm @ 80 psi).
What’s wrong with it
It hangs lower and further from the wall than a plain head, which is worth measuring for before you start.
What we can’t tell you
Delta publishes no installation time for the In2ition either.
Published specifications
| Flow rate | “1.75 gpm @ 80 psi, 6.6 L/min @ 552 kPa” |
|---|---|
| Spray settings | Five: “H2OKinetic spray, Full Body spray, Full Spray with Massage, Massaging spray” plus pause |
| Hose | “Includes 60 in. hose” |
| Overall height | “11-4/7″” |
| Technologies | H2Okinetic (“creates wave pattern for enhanced coverage”), In2ition two-in-one, MagnaTite docking |
| Certification | “WaterSense Labeled (uses 20% less water than industry standard)” |
Source: Delta, H2Okinetic In2ition 5-Setting Two-in-One Shower 58480-BL-PK
#ad Price $157.99 as of October 19, 2026. Prices change; Amazon’s listing is the one that counts. How we’re funded.
Where to buy
Everything recommended on this page, in one place. Each link is an Amazon Associates link — we earn a commission at no extra cost to you, and it never decides a pick.
- Check price on Amazon
High Sierra Classic Fixed Showerhead (FCS-100)
High Sierra Showerheads · FCS-100-CH · Renter verdict: Safe
- $157.99View on Amazon
Delta In2ition Two-in-One Shower, 1.75 GPM
Delta · 58480-BL-PK · Renter verdict: Safe
#ad Prices are not shown because we only publish figures we have verified on the day. How we’re funded.
Questions people actually ask
shower head how to replace
Unscrew the old head anticlockwise while holding the shower arm still, scrub the old tape off the threads, wrap three to four layers of PTFE tape clockwise, then screw the new head on hand-tight plus about a quarter turn with a wrench. Fifteen minutes, no water shut-off needed.
shower head how to install
The same job as replacing one: clean threads, fresh PTFE tape wrapped clockwise, hand-tight plus a quarter turn. For a handheld you then screw the hose into the cradle and the head onto the hose, both hand-tight and neither needing tape.
how to install shower arm
The arm threads into a fitting inside the wall, so it needs the same tape treatment on both ends and a gentler hand. If the arm turns while you are removing a head, stop — you are unscrewing the wall fitting, which is a different and much bigger job.
Sources
Read next
Back to Showers & Showerheads.