The bathroom move-out checklist
Everything on this site goes back to original in under half an hour, provided you kept the parts. Here is the order, and the two things people always forget.
By Sawyer V. · · How we research

The short answer
We earn a commission if you buy through the links on this page, at no extra cost to you. It does not change which products we pick or what we say about them — here is exactly how that works.
Quick picks
Tap any row for the full write-up. Prices are checked against Amazon rather than remembered — where we have no verified figure the button says so.
| # | Product | Best for | Renter | Price |
|---|---|---|---|---|
| 1 | No photo yet High Sierra Classic Fixed Showerhead (FCS-100) A universal 1/2-inch thread means the head you unscrew here screws straight onto the arm at the next address. | The upgrade you take to the next place | Safe | |
| 2 |  TUSHY Classic 3.0 Bidet Attachment Published to fit 95% of toilets, so the odds are good it fits the next one too — and reinstalling is the same nine minutes. | Reinstalling at the next address in nine minutes | Safe |
The two things people throw away
The original toilet supply hose. The flexible hose between the shut-off valve and the toilet tank. When you fit a bidet you disconnect it, reconnect it to the T-valve, and it stays in service — which lulls people into thinking they still have it. They do, but the T-valve goes with the bidet, and if the original hose has been replaced with the bidet’s own you need one to hand back.
The original showerhead. It comes off, it looks unremarkable, and it goes in the bin during the excitement of fitting a better one. Eleven months later it is the only thing standing between you and a fully restored bathroom.
Both are cheap to replace and annoying to source on the day you are moving. Bag them on day one.
Why order matters
Adhesive first, because it is the only step where haste causes damage. Do it while you are unhurried rather than at the end when the van is waiting.
Then the bidet, because it is the only step that needs the water off, and you want the water back on for the rest.
Then the showerhead, which needs the water on so you can check the joint.
Freestanding things last, because they are the ones that just get carried out.
Adhesive removal, in detail
This is the only place in a bathroom where a reversible upgrade can become damage in five seconds, so it is worth doing properly.
3M publishes the sequence: slide the hook or bar up and off its base, hold the base gently against the wall, and “always pull straight down”. The adhesive is engineered to elongate along the wall and release from both surfaces cleanly.
Pulling outward concentrates force at the edge of the bond, which is exactly how ordinary tape takes paint. A knife or a scraper will take paint or glaze, guaranteed.
If a tab breaks, warm the adhesive gently with a hairdryer on low and try again with dental floss sawed behind the base. Slow and warm beats fast and sharp.
Silicone-grip hooks need none of this — Tooletries publishes its products as “completely removable and reusable”. Peel a corner and lift.
The bidet reversal, step by step
Turn the shut-off valve clockwise until it stops. Flush and hold the handle down to empty the tank. Put a towel underneath.
Disconnect the bidet’s hose from the T-valve. Unscrew the T-valve from the tank inlet. Reconnect the original supply hose to that inlet with its rubber washer properly seated — hand-tight, no thread tape, because these joints seal on the washer.
Unbolt the seat, lift the bidet plate out, and bolt the original seat back down evenly and only until it stops moving.
Turn the water back on slowly and run a dry finger around the joint. Any dampness means the washer is not seated: water off, joint apart, look at the washer. Do not tighten harder.
The showerhead reversal
Wrap a cloth around the shower arm so the wrench does not mark it. Hold the arm still and turn your head anticlockwise — if the arm starts turning with it, stop and hold the arm more firmly.
Scrub the old PTFE tape off the arm threads with an old toothbrush until the metal is bare. Wrap three to four layers of fresh tape clockwise. Fit the original head hand-tight plus about a quarter turn.
Run the shower for a minute and check the joint. The full method is here.
Five minutes of finishing
Rubbing alcohol on every adhesive spot. Even where it looks clean. Residue picks up dirt and leaves an outline.
Rubber feet marks. A tension pole leaves faint circles on a floor. They wipe off.
Descale what you are handing back. If you are refitting an old showerhead that has been in a cupboard for two years, give it an hour in vinegar first. Handing back a working head rather than a blocked one costs a dollar and reads well. The method is here.
Photograph it. The restored bathroom, before you leave. A dated photograph is the cheapest insurance in the deposit process, and it takes ten seconds.
What is coming with you
A showerhead with a universal thread. A bidet attachment published to fit 95% of toilets. A tension caddy that fits any ceiling between six and nine feet. Hooks that are reusable with fresh strips.
That is the argument for the whole approach. None of it was ever really an improvement to someone else’s property — it was your bathroom, temporarily installed in their room, and now it is going with you.
Every pick in full
2 we would buy. Each carries its Renter-Safe Install Rating, the published specs behind it, and the honest gap in what we know.
1. Comes with you
High Sierra Classic Fixed Showerhead (FCS-100)
High Sierra Showerheads · FCS-100-CH · best for the upgrade you take to the next place
A universal 1/2-inch thread means the head you unscrew here screws straight onto the arm at the next address.
The reason a showerhead is the best first purchase in a rental is that it is also the best purchase to move with. High Sierra publishes a “universal 1/2″ - 14 NPS or NPT male threads size”, which is the standard on effectively every American shower arm.
Unscrew it, put it in the box, screw it on at the next place. Solid metal survives the move in a way a plated plastic head may not.
Renter-Safe Install Rating
- Drilling
- None
- Tools
- One wrench
- Time to fit
- Not published
- Power
- None
- Reversible on move-out
- Fully
Why: It threads onto the existing 1/2″ shower arm and nothing else is touched. Keep the old head in a drawer, screw it back on the day you move, and the bathroom is exactly as you found it.
Read from published documentation, not from fitting one. High Sierra Showerheads, Classic Fixed Showerhead FCS-100-CH. How the verdict is derived: renter-safe ratings explained.
What it costs to run — Water
- Flow rate
- 1.25 GPM (the lowest published option)
- Shower length
- 8 minutes
- Showers
- 365 a year
1.25 GPM x 8 min x 365 = 3,650 gallons a year, against 7,300 for a 2.5 GPM head
About 3,650 gallons a year saved against a full-flow head
Arithmetic on published specifications, not a measurement. Rate source: High Sierra Showerheads, Classic Fixed Showerhead product page (published flow-rate options).
What’s wrong with it
No spray settings.
What we can’t tell you
No published install time.
Published specifications
| Flow rate options | 1.25 GPM (“Saves up to 50% water and the energy to heat it”) through 2.5 GPM (“Maximum flow rate per shower head allowed nationally by the Federal Government”) |
|---|---|
| Nozzle design | A single nozzle that works “just like nature does, by colliding water to create a rain-like cascade of large, heavy, high-energy droplets” |
| Material | “Solid lead-free and corrosion resistant metal construction” |
| Thread | “Connects to shower arms, extensions, filters, etc with universal 1/2″ - 14 NPS or NPT male threads size” |
| Certification | “Independently tested and certified to WaterSense and WaterMark” |
| Guarantee | “The NEVER-CLOG GUARANTEE is void if the mesh screen is removed” |
| Made in | “Engineered and built in the USA” |
| Tools supplied | A wrench is supplied with the showerhead |
Source: High Sierra Showerheads, Classic Fixed Showerhead FCS-100-CH
#ad We have no verified live price for this one right now, so we are not showing a number. How we’re funded.
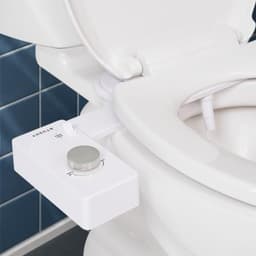
2. Also comes with you
TUSHY Classic 3.0 Bidet Attachment
TUSHY · Classic 3.0 · best for reinstalling at the next address in nine minutes
Published to fit 95% of toilets, so the odds are good it fits the next one too — and reinstalling is the same nine minutes.
A bidet attachment moves as easily as it fits. TUSHY publishes a fit of “95% of toilets, round or elongated”, with the published exception of French Curve toilets, so it is likely to work at the next address without buying anything.
Keep the T-adapter and hose with the unit — those are the parts that go missing between homes, and they are the parts you need.
Renter-Safe Install Rating
- Drilling
- None
- Tools
- Hands only
- Time to fit
- About 9 minutes (TUSHY publishes “8 ½ minutes or less”)
- Power
- None
- Reversible on move-out
- Fully
Why: It sits between the toilet bowl and the existing seat and tees off the tank fill line. Nothing is drilled, nothing is cut, and the original seat goes back on in the same nine minutes it took to fit.
Read from published documentation, not from fitting one. TUSHY, Classic 3.0 bidet attachment product page and FAQ. How the verdict is derived: renter-safe ratings explained.
What’s wrong with it
Cold water only.
What we can’t tell you
No published materials, so we cannot speak to how it survives being boxed.
Published specifications
| Water | Fresh cold water only — “cleans your butthole with fresh water, the same as your sink or shower” |
|---|---|
| Nozzle | “Patented Self Cleaning SmartSpray™ nozzle” that “cleans after every spray and tucks away when not in use”, with a “precision nozzle adjuster” |
| Control knob | “antimicrobial bamboo or brass knob” |
| Dimensions | “16″L x 9″W x 3.5″H”, “2 lbs” |
| In the box | “TUSHY Classic 3.0 Bidet Attachment. Tank Adapter and Flexible TUSHY hose for an easy install on almost any toilet. TUSHY Classic 3.0 Owner’s Manual. 1-year Limited Warranty.” |
| Install time | “Easy install in 8 ½ minutes or less on most standard toilets” |
| Tools | “you don’t need any plumbing expertise…using a basic screwdriver and the connections included” |
| Power | “No outlet needed” |
| Fit | Fits “95% of toilets, round or elongated”; does not fit French Curve toilets |
| Warranty | “1-year Limited Warranty” |
Source: TUSHY, Classic 3.0 bidet attachment product page and FAQ
#ad Price $129.00 as of October 19, 2026. Prices change; Amazon’s listing is the one that counts. How we’re funded.
Where to buy
Everything recommended on this page, in one place. Each link is an Amazon Associates link — we earn a commission at no extra cost to you, and it never decides a pick.
- Check price on Amazon
High Sierra Classic Fixed Showerhead (FCS-100)
High Sierra Showerheads · FCS-100-CH · Renter verdict: Safe
- $129.00View on Amazon
TUSHY Classic 3.0 Bidet Attachment
TUSHY · Classic 3.0 · Renter verdict: Safe
#ad Prices are not shown because we only publish figures we have verified on the day. How we’re funded.
Questions people actually ask
how to remove command hooks without damaging wall
Slide the hook up and off its base, hold the base gently against the wall, and pull the release tab straight down along the wall. 3M's published instruction is to always pull straight down. If a tab breaks, warm the adhesive gently and work behind the base with dental floss.
will removing a bidet damage the toilet
No, if it went on correctly. The T-valve threads onto the toilet's existing fill connection, which is designed to be disconnected. Reconnect the original supply hose with its washer seated, hand-tight, and check the joint with the water back on.
renter friendly bathroom upgrades
The ones you can undo in half an hour: showerheads, bidet attachments, toilet seats, tension and hanging storage, adhesive hooks and anything that plugs in. Keep the original parts and every one of them reverses cleanly.
Sources
Read next
Back to Renter-Safe Upgrades.